Learn
Last updated April 10, 2026
How to brighten a photo online
without washing out the subject
If you want to brighten a photo online, the useful job is not just pushing exposure upward. The real goal is to recover a darker image while keeping skin, background, and overall mood believable. That is where AnyCap image generation plus image understanding creates a stronger workflow than a generic brightness slider.
Answer-first summary
A useful brightening workflow means controlled enhancement plus QA. AnyCap helps the agent brighten a dark photo, soften harsh shadow, and inspect whether the result still feels like the same person in the same scene rather than an overprocessed edit.
Generated proof
A real low-light portrait correction
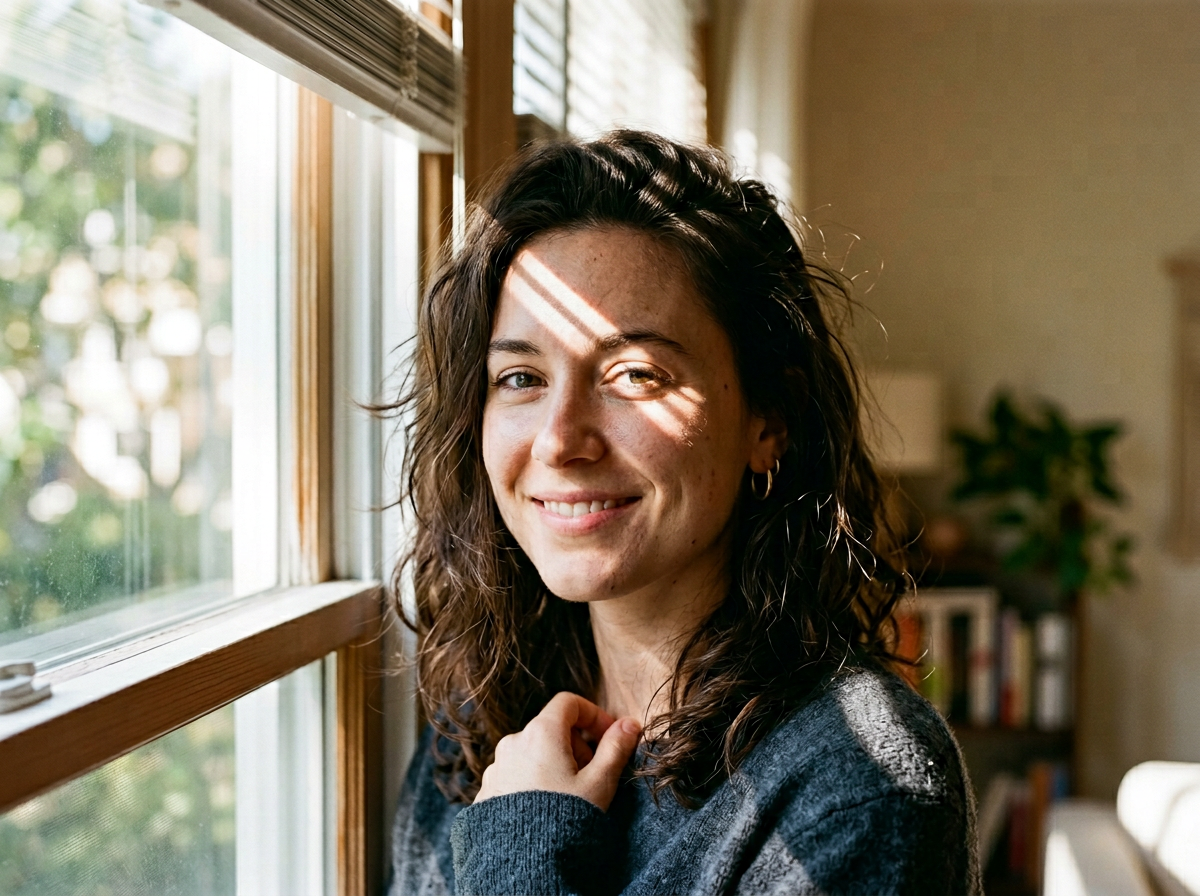
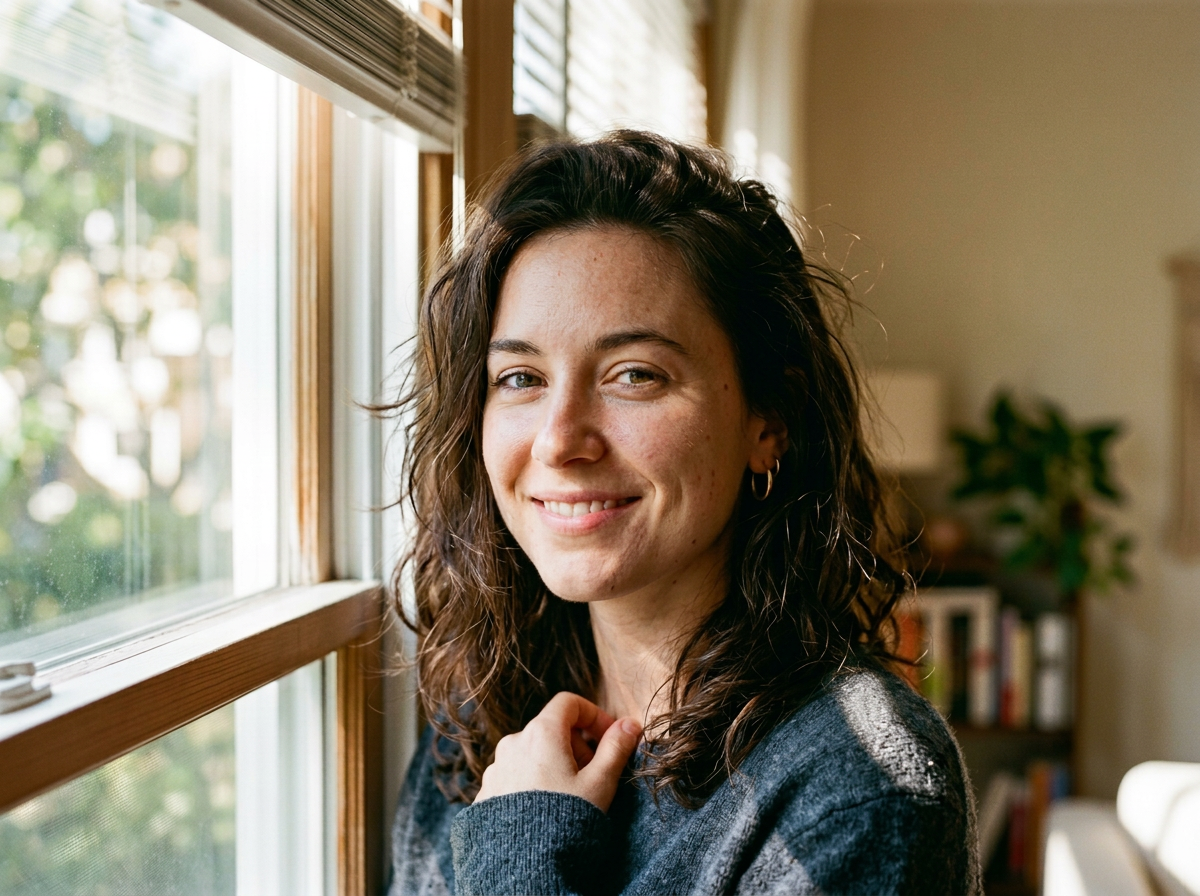
This page uses a real before-and-after proof pair generated with AnyCap. The left frame is the darker portrait with a strong strip of light and shadow across the face. The right frame brightens the photo and softens the harsh contrast while preserving the same subject, pose, and room.
Source photo
Brightened result
Edit prompt used with AnyCap
brighten this indoor portrait naturally, lift the midtones and face exposure, soften the harsh shadow across the face, preserve the same woman, pose, window framing, sweater texture, and room details, realistic daylight, no text, no watermark
Why this proof matters
- It shows an actual correction workflow instead of a synthetic stock slider demo.
- The result keeps the same portrait framing, which makes the lighting fix easy to judge.
- It supports the more honest claim AnyCap can make first: brighten the photo while preserving realism, then inspect the result.
The left image is the darker source portrait. The right image is the AnyCap brightened result generated from that same file.
Quick answer
Brightening is useful only when the photo still feels real
A quick exposure slider can make a photo brighter and worse at the same time. The useful question is whether the edit recovers visibility without flattening skin, clipping highlights, or making the room look fake. That is why the better workflow is brighten plus inspect.
- The prompt should say what kind of brightness change you want and what should remain stable in the frame.
- Midtone recovery and shadow softening are usually more important than simply increasing global brightness.
- A good workflow checks that the brighter result still looks like the same person in the same light, not a different generated portrait.
Portrait rescue
Best when a face is underexposed or partially shadowed but the expression and composition are already worth keeping.
Window-light correction
Useful when a strong beam of light creates a harsh stripe that makes the photo harder to reuse.
Content and profile reuse
Strong when the image needs to look cleaner for docs, bios, social profiles, or landing-page blocks without becoming overedited.
Workflow
Five steps from dark source to publishable image
Step 1
Keep the image that already has the right moment
Start from the photo whose expression, pose, and framing you want to preserve. This workflow is about correction, not replacement.
Step 2
Describe the lighting problem precisely
Call out underexposure, harsh facial shadow, backlighting, or dim indoor light so the edit solves the right issue.
Step 3
Protect the subject identity
Repeat that the same person, pose, outfit, and room should stay stable while brightness changes.
Step 4
Inspect realism after the edit
Check that skin tone, window light, and room depth still feel natural and were not flattened into a washed-out look.
Step 5
Branch into a second pass if needed
If the first brightening fix is too soft or too aggressive, run a narrower follow-up prompt instead of starting from zero.
Why the workflow matters
Brightness slider versus agent workflow
Primary goal
Generic slider
Make the whole image brighter, even if highlights clip and skin loses nuance.
AnyCap workflow
Recover visibility while keeping the photo recognizable, believable, and channel-ready.
How the fix is described
Generic slider
Mostly numeric, with little control over what should stay unchanged.
AnyCap workflow
The prompt can describe the exact lighting issue and the scene details that must remain stable.
Quality control
Generic slider
The user eyeballs the slider result and stops there.
AnyCap workflow
The agent can inspect the result with image reading and decide whether a tighter shadow-softening pass is needed.
Model choice
The current AnyCap stack for brightening photo workflows
Best first pass
Nano Banana Pro
The strongest first option when you already have the source photo and want a natural-looking correction with better preservation of identity and composition.
Fast iteration
Nano Banana 2
Useful when you want quick alternate passes for slightly brighter, softer, or more contrast-balanced versions.
QA layer
Image Understanding
Use image reading after generation to confirm that the brighter photo still looks natural and artifact-free.
What to validate
Four checks before you export the brighter version
The same subject remains
Confirm the edit kept the same face, hairstyle, pose, and expression instead of drifting into a subtly different portrait.
Shadows were softened, not erased unrealistically
The goal is usually better visibility, not a flat face with no light direction left at all.
Highlights still feel controlled
Check the window area, skin reflections, and bright fabric so the correction does not clip into a washed-out mess.
No visible AI residue
Look for distorted eyes, smeared skin, broken fingers, random text, or watermark artifacts before you reuse the image.
CLI examples
Example commands aligned with the current schema
Brighten a dark portrait naturally
anycap image generate \
  --model nano-banana-pro \
  --mode image-to-image \
  --prompt "brighten this indoor portrait naturally, lift the midtones and face exposure, soften the harsh shadow across the face, preserve the same woman, pose, window framing, sweater texture, and room details, realistic daylight, no text, no watermark" \
  --param images=./portrait-dark.png \
  --param aspect_ratio=4:3 \
  --param resolution=2k \
  -o portrait-brightened.png
Run a softer shadow pass if needed
anycap image generate \
  --model nano-banana-2 \
  --mode image-to-image \
  --prompt "keep the same portrait and composition, reduce only the remaining hard facial shadow and gently brighten the cheek and eye area, preserve realistic skin tone and window light, no text, no watermark" \
  --param images=./portrait-brightened.png \
  --param aspect_ratio=4:3 \
  --param resolution=2k \
  -o portrait-brightened-pass-2.png
QA the corrected image
anycap actions image-read \
  --file ./portrait-brightened.png \
  --instruction "Describe the portrait, confirm whether the same person and framing were preserved, and mention any sign of washed-out highlights, distorted facial detail, visible text, or watermark."
FAQ
Questions that usually come next
Is brightening a photo the same as removing shadows?
Not exactly. Brightening a photo is a broader correction goal that may include lifting exposure, opening shadows, and recovering visibility. Full shadow removal is narrower and often needs a more specific workflow.
Why use an agent workflow instead of a brightness slider?
Because the useful outcome is not just a brighter file. It is a brighter file that still looks like the same subject in the same room. The AnyCap workflow lets you define the correction in words, then inspect whether the result stayed believable.
What kind of photos are good candidates for this workflow?
Portraits near windows, indoor photos with harsh directional light, and underexposed content images are strong candidates. It works best when the original composition is already worth saving.
Can AnyCap tell me whether the result looks overprocessed?
Yes. After generation, you can use image reading to describe the corrected photo and call out highlight clipping, strange skin texture, visible artifacts, or other signs that the edit should be refined.
Next move
Keep going from the edit you need next
How to Remove People from Photos
Go here when the main problem is a distracting person in the frame rather than underexposure or harsh light.
How to Change a Photo Background
Use this when the subject and exposure are fine but the environment around the photo needs to change.
Nano Banana Pro
Read the model page when you want the strongest current fit for source-photo enhancement and cleanup.
Install AnyCap
Start here if you want the CLI ready before testing the same correction workflow on your own photo.